Friday, 31 July 2015

New ALT TAB Button in Windows 10

New ALT TAB Button in Windows 10


  • Earlier to Jump Between different Application we have to Minimize one and maximize one. 
  • Then we started using ALT+TAB button to switch between different Application windows
  • Now Microsoft has given a button next to Search Box in Windows 10
  • If you Click on it You can jump between various windows.
  • This has been done to make compaitable with Windows Tab (Surface) and Windows Phone

New Search Box in Windows 10

New Search Box in Windows 10


  • Earlier version of Windows You have to click on Start to Search.
  • But In Windows 10 this has been moved next to Start in Launch Bar itself
  • So you can SEARCH for Notepad and Word and it will show up

Thursday, 30 July 2015

Where is All Programs in Windows 10. Its now called All Apps

Where is All Prgrams in Windows 10. Its now called All Apps

  • Lot of Things have Changed in Windows 10.
  • One Such important thing that change is All Programs.
  • Earlier we use to Click Start-->All Programs to Find our Application.
  • But with Windows 10, this has been Changed to Start -->All Apps
  • This is Done so that its compatible with Windows Phone.
  • So hope you get used to it :)


Tuesday, 28 July 2015

SCOM 2012 R2 Data warehouse command to get information on Various Tables and how much space they are talking

SCOM 2012 R2 Data warehouse command to get information on Various Tables and how much space they are talking


  • SCOM Data warehouse is the one where we store all data for longtime.
  • Usually this will be in terabytes of data and will fill very fast if not confiureged properly
  • Most offten you can see that the Datawarehouse if Full or going to be full and you want to find out what is the configuration and which Table is taking the most data
  • Microsoft has pushed a command line tool in SCOM 2012 R2 called dwdatarp.exe
  •  To get the list of tables using more space and configuration use the below command

dwdatarp.exe -s SQLServer\DatabaseName -d OperationsManagerDW > c:\dwoutput.txt


  • This will give you the output with Space used and the How many days of data is stored.

Monday, 27 July 2015

Command to Get List of Patches installed on Windows 2008 R2 and Windows 2012

Command to Get List of Patches installed on Windows 2008 R2 and Windows 2012


  • Manytime we get request from application owners who request for list of patches instaled and on what date
  • You can use the below command to get the list of Patches from the server. This will Create a html file called hotfix.html in your C: drive.
  • wmic qfe list brief /format:htable > "c:\hotfix.html"

Thursday, 16 July 2015

Take Screenshot or Screen Captures in Windows 10 Made easy

Take Screenshot or Screen Captures in Windows 10

  • Earlier we have to use the PrintScreen button to take screenshots.
  • This has been understood by microsoft that its a teadious task.
  • So they have included a new tool called "Snipping Tool"
  • Select the sniping tool by clicking on start and search for "Snipping tool" and click on it
  • This will open the snipping tool. Now click on new and select the area you want to take screenshot and save it. So easy.

Saturday, 4 July 2015

Add new Disk on Virtual Servers in Windows Azure

Extend Disk on Virtual Servers in Windows Azure


  • First Login to Windows Azure portal and your Virtual Mahcine and select "Attach an Empty Disk"
  • Now enter the Disk Size you want and click Create

Create Virtual Network in your Azure - Step by Step

Create Virtual Network in your Azure

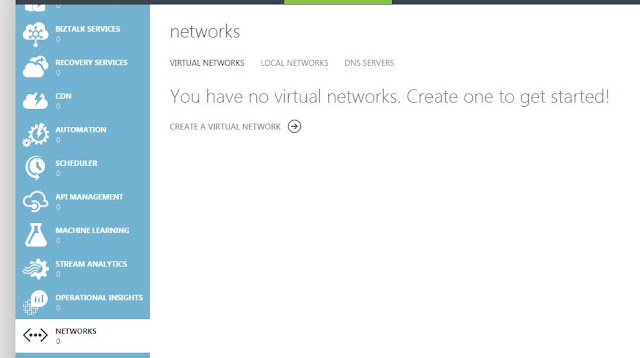
  • Before you Create your Virtual Server , you need to create your virtual network in your Azure platform. or else you cant assign static IP to your Server.
  • Login to your Azure portal and click on Networks
  • Click on "Create a Virtual Network"

  • Now enter your Virtual Network Name and enter the Location
  • Next  enter the DNS server Name and IP.

  • Select the Subnet and select the Range.

  • Click next and your Virtual Network is created.

Step by Step instruction to Create a Windows 2012 R2 Server in Windows Azure

Step by Step instruction to Create a Windows 2012 R2 Server in Windows Azure


  • Inorder to create a new Windows 2012 R2 server, login to your Azure portal and click on virtual machines Tab

  • Now Click on "Create A Virtual Machine"

  • Then Click Quick Create and select IMAGE which ever OS you want in this we will install "Windows Server 2012"  and Configuration you want. Also give the admin Name and password of your VM and which region  you want your VM to be in and click "Create Virutl Machine"
  • This will start building your VM and it will be ready in few Minutes.


  • One its ready Click on Connect in the Bottom and it will prompt you to open RDP file of server.Download the RDP file to your desktop

  • Now Double click the RDP file and Click Connect. Enter the Username and Password  and you will get the RDP of the server.

Wednesday, 1 July 2015

How to Scope your Microsoft Operations Manager Suite Dasboard

How to Scope your Microsoft Operations Manager Suite Dasboard


  • Dashoard is very useful place to see an overview of your enviornment.
  • Sometimes you want to see how the error are are for last 1 hour or last 4 hours.
  • For this can use the Scope feature in your Operations Manager Dashboard.
  • Click on "My Dashboard" in MOM Suite.
  • This will show data by defaukt for last 7 days.
  • On Right hand Side Click on Scope and Change the Date and time that you want.


How to add new Solutions to your Microsoft Operations Manager Solutions Suite

How to add new Solutions to your Microsoft Operations Manager Solutions Suite


  • To add new Solutions to your Microsoft Operations Manager Solutions,do the following.
  • Login to Your Microsoft Operations Manager Solutions
  • Now Click on Solution Gallery Tab
  • This will take you to Solutions Gallery where you see Different Solutions on Right Side.
  • Now Click on the Solution You want in This we click on "Security and Audit"

  • Now Click "Add" and your solution will be added to your dasboard.

Install SCOM 2012 R2 agent on Servers Hosted in Microsoft Azure Cloud

Install SCOM agent on Servers Hosted in Microsoft Azure Cloud


  • Microsot Azure is the Cloud Solution from Microsoft. You can Install SCOM agents and Monitor them using your Existing SCOM environment.
  • To Install SCOM agent on Windows Serve hosted in Microsoft Azure Cloud
  • Logon to Your Azure Portal
  • Then Click on Operation Insight Tab on the left


  • Then Click on the Workspace that you see 


  • Now You will be taken to the Dashboard Page,Now Click on SERVERS Tab


  • Now Click on "Enable OP INSIGHTS"

      • And Install SCOM agent on the Server. This will install SCOM agent on server automatically.


      • Now Login to Your Server and Go to Control Panel and Open Microsoft Monitoring Agent. YOu can see that the agent ins installed.If you have In house SCOM server then configure you Management server and your SCOM management group. in Operations Manager Tab. By Default it Connects to Microsoft Operaions Manager

      • You can see that after some time MP's get downloaded and Monitoring Start.