Showing posts with label Install. Show all posts

Wednesday, 26 April 2017

Install Bash Shell on Windows to Execute Linux Commands from Windows

Install Bash Shell on Windows to Execute Linux Commands from Windows


  • To install Bash,your PC should be running a 64-bit version of Windows 10 Anniversary Update build 14393 or later
  • Now Open Settings -> Update and Security -> For developers
  • Select the Developer Mode radio button

  • Then from Start, search for "Turn Windows features on or off" (type 'turn')
  • Select Windows Subsystem for Linux (beta)

  • Click OK
  • Now Open a PowerShell prompt as administrator and run:
Enable-WindowsOptionalFeature -Online -FeatureName Microsoft-Windows-Subsystem-Linux


  • Restart your computer when prompted

Install Azure CLI 2.0 on Apple mac OS Step by Step Tutorial

Install Azure CLI 2.0 on Apple mac OS Step by Step Tutorial


  • To install Azure CLI on your Mac OS type the following command
curl -L https://aka.ms/InstallAzureCli | bash

  • Then restart your command shell for some changes to take effect.
exec -l $SHELL


Tuesday, 17 January 2017

Install a Linux SQL Server VM in Azure Step by Step Tutorial

 Install a Linux SQL Server VM in Azure Step by Step Tutorial


To Create a Linux VM with SQL Server installed

  • Open the Azure portal.
  • Click New on the left.
  • In the New blade, click Compute.
  • Click See All next to the Featured Apps heading.
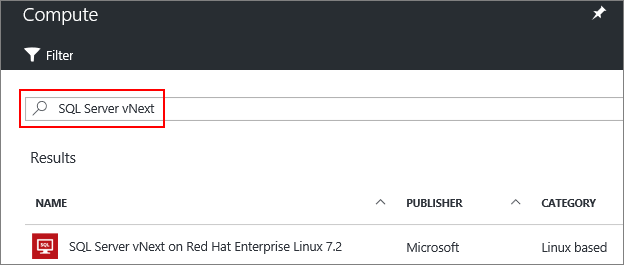
  • In the search box, type SQL Server vNext, and press Enter to start the search.


  • Select a SQL Server vNext image from the search results.
  • Click Create.
  • On the Basics blade, fill in the details for your Linux VM.
  • Click OK.
  • On the Size blade, choose a machine size. For development and functional testing, we recommend a VM size of DS2 or higher. For performance testing, use DS13 or higher.

  • Click Select.
  • On the Settings blade, you can make changes to the settings or keep the default settings.
  • Click OK.
  • On the Summary page, click OK to create the VM.

Install SQL Server tools on Red Hat Enterprise Linux Step by Step tutorial

Install SQL Server tools on Red Hat Enterprise Linux


  • Enter superuser mode.

sudo su


  • Download the Microsoft Red Hat repository configuration file.


curl https://packages.microsoft.com/config/rhel/7/prod.repo > /etc/yum.repos.d/msprod.repo


  • Exit superuser mode.


exit


  • Run the following commands to install 'mssql-tools' with the unixODBC developer package.


sudo yum update
sudo yum install mssql-tools unixODBC-utf16-devel

Install SQL Server on Red Hat Enterprise Linux 7.3 Step by Step Tutorial

Install SQL Server on Red Hat Enterprise Linux 7.3 Step by Step Tutorial


Video:


  • You need at least 3.25GB of memory to run SQL Server on Linux. 
  • To install the mssql-server package on RHEL, follow these steps:
  • Enter superuser mode.

sudo su

  • Download the Microsoft SQL Server Red Hat repository configuration file:

curl https://packages.microsoft.com/config/rhel/7/mssql-server.repo > /etc/yum.repos.d/mssql-server.repo

  • Exit superuser mode.

exit

  • Run the following commands to install SQL Server:

sudo yum install -y mssql-server

  • After the package installation finishes, run the configuration script and follow the prompts. Make sure to specify a strong password for the SA account (Minimum length 8 characters, including uppercase and lowercase letters, base 10 digits and/or non-alphanumeric symbols).

sudo /opt/mssql/bin/sqlservr-setup

  • Once the configuration is done, verify that the service is running:

systemctl status mssql-server

Saturday, 15 October 2016

SCCM 2012 R2 Server Install Log files

SCCM 2012 R2 Server Install Log files


Site Server Installation Log Files

The following table lists the log files that contain information related to site installation.
Log name
Description
Computer with log file
ConfigMgrPrereq.log
Records pre-requisite component evaluation and installation activities.
Site server
ConfigMgrSetup.log
Records detailed output from site server setup.
Site Server
ConfigMgrSetupWizard.log
Records information related to activity in the Setup wizard.
Site Server
SMS_BOOTSTRAP.log
Records information about the progress of launching the secondary site installation process. Details of the actual setup process are contained in ConfigMgrSetup.log.
Site Server
smstsvc.log
Records information about the installation, use, and removal of a Windows service that is used to test network connectivity and permissions between servers, using the computer account of the server initiating the connection.
Site server and site systems

Wednesday, 14 September 2016

Install-ADDSDomainController: PowerShell Command to Promote a Server to Domain Controller

PowerShell Command to Promote a Server to Domain Controller


Install-ADDSDomainController -SkipPreChecks -NoGlobalCatalog:$false -CreateDnsDelegation:$false `
-CriticalReplicationOnly:$false -DatabasePath "C:\Windows\NTDS" -DomainName "Contoso.com" `
-InstallDns:$true -LogPath "C:\Windows\NTDS" NoRebootOnCompletion:$false -SiteName `
"Default-First-Site-Name" `-SysvolPath "C:\Windows\SYSVOL" -Force:$true


  • Install-ADDSDomainController will promote the Server to Domain Controller.
  • -SkipPreChecks will skip the prechecks and will procced with the install
  •  -NoGlobalCatalog:$false Will not install Global Catalog Component on this server.
  • -CreateDnsDelegation:$false Will not create DNS Delegation on this server
  • -DatabasePath tell where should be the NTDS Folder Location
  • -DomainName tell your Domain Name
  • -InstallDns:$true Installs DNS Component on the server
  • -LogPath tells the LogPath Location.
  •  NoRebootOnCompletion:$false Will not reboot the server after install.If you want to reboot make it $true
  • -SiteName Enter the AD Site name where server has to be installed
  • -SysvolPath Location of the Sysvol folder

Saturday, 10 September 2016

Troubleshooting OS Deployement errors during SCCM 2012 R2 Push Install

Troubleshooting OS Deployement errors during SCCM 2012 R2 Push Install


  • SCCM is the widely used tool for OS deployement.
  • The reason being very effective Step by Step Install Task equence which give great flexibitly to Administrator to deploy consistent image in the organization.
  • So one of the frequest issues i face is that the OS deploy fails in the middle even if ts standarize image.
  • So to troubleshoot OS deployment errors you need to look for errors in SMSTS.log
  • This task will show in which Task Sequence it got failed.
  • It will also give you the error code which you can then google to get more information.
  • So while the OS is deployed connect to the server where it is deployed and Press F8
  • Then type CMDTRACE command. This will open the Log viewer
  • The location of SMSTS.log is "\WINDOWS\TEMP\SMSTSlog"
  • Open the logfile in CMDTRACE and check for errors.

Monday, 5 September 2016

Azure PowerShell Step By Step Tutorial

Azure PowerShell Step By Step Tutorial


What is Azure PowerShell:

  • Azure PowerShell is a set of modules that provide cmdlets to manage Azure with Windows PowerShell. 
  • You can use the cmdlets to create, test, deploy, and manage solutions and services delivered through the Azure platform. 
  • The cmdlets can be used for the same tasks as the Azure Management Portal, such as creating and configuring cloud services, virtual machines, virtual networks, and web apps.
How to Install Azure PowerShell on your Computer:


There are 2 Ways you can install Azure PowerShell

First Type:
Second Type:

  • Open PowerShell in Eleveated Prompt as Admin

Install-Module AzureRM

  • Above Command Install the Azure Resource Manager modules from the PowerShell Gallery
Install-Module Azure

  • Install the Azure Service Management module from the PowerShell Gallery

Thursday, 10 March 2016

Dont install the latest Window OS Management pack -Serious Issues can mess up your monitoring

Dont install the latest Window OS Management pack -Serious Issues can screw up your monitoring


  • Recently released Microsoft OS MP has some serious issues.
  • There is total broken up and the Disk Monitoring is totally mess up.
  • People around the world are complaining about it.
  • I cant imagine when the product has so much investment each time when the OS MP comes it causes lot of issue.
  • I dont know when Microsoft is going to stick to the standard and release a quality OS MP without any issue.
  • Latest verison of this MP is 6.0.7297.0 and it a total avoid :)

Thursday, 5 November 2015

How to Install Zabbix on Red Hat Linux or Cent OS Step by Step


How to Install Zabbix on Red Hat Linux or Cent OS


Zabbix is the fastest growing monitoring tool today in market. Lot oc companies want to cut down the cost on monitoring and move to Opensource and Zabbix has emerged as the prefered choice.

Step 1: Installing repository configuration package


  • Install the repository configuration package. This package contains yum configuration files.


Command:

# rpm -ivh http://repo.zabbix.com/zabbix/2.4/rhel/6/x86_64/zabbix-release-2.4-1.el6.noarch.rpm


Step 2: Installing Zabbix packages

Install Zabbix packages. This example  install Zabbix server and web frontend with mysql database on same server

Command:

# yum install zabbix-server-mysql zabbix-web-mysql zabbix-agent

If you want to install agent only for monitoring follow the below steps

# yum install zabbix-agent


Step 3:Creating initial database

Create zabbix database and user on MySQL. Import initial schema and data.

Command:

# cd /usr/share/doc/zabbix-server-mysql-2.4.0/create
# mysql -uroot zabbix < schema.sql
# mysql -uroot zabbix < images.sql
# mysql -uroot zabbix < data.sql

Edit database configuration in zabbix_server.conf

# vi /etc/zabbix/zabbix_server.conf
DBHost=localhost
DBName=zabbix
DBUser=zabbix
DBPassword=zabbix

You can give any complex password you want.

Step 4:Start Zabbix server process:

# service zabbix-server start

Step 5:Editing PHP configuration for Zabbix frontend

Apache configuration file for Zabbix frontend is located in /etc/httpd/conf.d/zabbix.conf. Some PHP settings are already configured.

# vi /etc/httpd/conf.d/zabbix.conf

php_value max_execution_time 300
php_value memory_limit 128M
php_value post_max_size 16M
php_value upload_max_filesize 2M
php_value max_input_time 300
# php_value date.timezone Europe/Riga
It's necessary to uncomment the “date.timezone” setting and set the right timezone for your location.

After changing the configuration file restart the apache web server.

# service httpd restart

Step 6: Done Your server is ready


  • Zabbix frontend is available at http://ipddress/zabbix in the browser. 


Default username/password is Admin/zabbix.


Enjoy!


Wednesday, 1 July 2015

Install SCOM 2012 R2 agent on Servers Hosted in Microsoft Azure Cloud

Install SCOM agent on Servers Hosted in Microsoft Azure Cloud


  • Microsot Azure is the Cloud Solution from Microsoft. You can Install SCOM agents and Monitor them using your Existing SCOM environment.
  • To Install SCOM agent on Windows Serve hosted in Microsoft Azure Cloud
  • Logon to Your Azure Portal
  • Then Click on Operation Insight Tab on the left


  • Then Click on the Workspace that you see 


  • Now You will be taken to the Dashboard Page,Now Click on SERVERS Tab


  • Now Click on "Enable OP INSIGHTS"

      • And Install SCOM agent on the Server. This will install SCOM agent on server automatically.


      • Now Login to Your Server and Go to Control Panel and Open Microsoft Monitoring Agent. YOu can see that the agent ins installed.If you have In house SCOM server then configure you Management server and your SCOM management group. in Operations Manager Tab. By Default it Connects to Microsoft Operaions Manager

      • You can see that after some time MP's get downloaded and Monitoring Start.

      Monday, 29 June 2015

      Lync 2013 MP Install Step by Step SCOM 2012 R2

      Lync 2013 MP Install Step by Step:


      • Lync has taken over the entire communication channel.
      • Gone are the VOIP IP Cisco Phones which use to sit on your Desk.
      • Today everything is going to Mobile and Lync is the best and cheapest option from Micrososft.
      • So almost all enterprise have decided to migrate to Lync. So much is the Lync affects today that, we need a realtime monitoring more critical then outlook.
      • So Microsoft has worked on it very hard and have brought the realtime Monitoring using SCOM for Lync 2013.
      Microsoft Lync Server 2013 includes two SCOM management packs:

      • The Component and User Management Pack (Microsoft.LS.2013.Monitoring.ComponentAndUser.mp):
      • This MP Monitors Lync Server issues recorded in event logs, registered by performance counters, or logged in the call detail records (CDR) or the Quality of Experience (QoE) databases.

      Active Monitoring Pack (Microsoft.LS.2013.Monitoring.ActiveMonitoring.mp):

      • This MP proactively tests key Lync Server components such as logging on to the system, exchanging instant messages, or making calls to a phone located on the public switched telephone network (PSTN). These tests are conducted using the Lync Server synthetic transaction cmdlets. 

      Example:

      Test-CsIM: cmdlet is used to simulate an instant messaging conversation between a pair of test users. If this simulated messaging conversation fails an alert will be generated.

      Steps to Install MP:

      • Download the files Microsoft.LS.2013.Monitoring.ActiveMonitoring.mp and Microsoft.LS.2013.Monitoring.ComponentAndUser.mp.
      • In System Center Operations Manager, click Administration.In the Administration pane, right-click Management Packs, and then click Import Management Packs.
      • In the Select Management Packs dialog box, click Add, and then click Add from disk.
      • In the Online Catalog Connection dialog box, click Cancel to prevent Operations Manager from going online to see if any dependencies exist for the Lync Server management packs. If you are using System Center Operations Manager 2012, click No.
      • In the Select Management Packs to import dialog box, locate and select the files Microsoft.LS.2013.Monitoring.ActiveMonitoring.mp and Microsoft.LS.2013.Monitoring.ComponentAndUser.mp and then click Open. To select multiple files in the dialog box, click the first file, hold down the Ctrl key and then click the second file.
      • In the Select Management Packs dialog box, click Install. If you get an error message and installation fails, that typically means that the management pack files are in a folder protected by the Windows User Account Control. If this occurs, copy the files to a different folder and then restart the import and installation process.
      • In the Select Management Packs dialog box, click Close. Note that the import and installation process might require several minutes to complete.

      Tuesday, 12 May 2015

      Install SCOM 2012 R2 agent using SCCM or command line

      Install SCOM 2012 R2 agent using SCCM:

      Inorder to install SCOM agent using SCCM, we have to follow the belwo procedure. Please use the below command line script which you use to install the SCOM agent from command line or SCCM


      %WinDir%\System32\msiexec.exe /i path\Directory\MOMAgent.msi /qn USE_SETTINGS_FROM_AD={0|1} USE_MANUALLY_SPECIFIED_SETTINGS={0|1} MANAGEMENT_GROUP=MGname MANAGEMENT_SERVER_DNS=MSname MANAGEMENT_SERVER_AD_NAME =MSname SECURE_PORT=PortNumber ACTIONS_USE_COMPUTER_ACCOUNT={0|1} ACTIONSUSER=UserName ACTIONSDOMAIN=DomainName ACTIONSPASSWORD=Password AcceptEndUserLicenseAgreement=1

      USE_SETTINGS_FROM_AD={0|1}:

      Indicates whether the management group settings properties will be set on the command line. Use 0 if you want to set the properties at the command line. Use 1 to use the management group settings from Active Directory.

      USE_MANUALLY_SPECIFIED_SETTINGS=={0|1}:

      If USE_SETTINGS_FROM_AD=1, then USE_MANUALLY_SPECIFIED_SETTINGS must equal 0.

      MANAGEMENT_GROUP=MGname:

      Specifies the management group that will manage the computer.


      MANAGEMENT_SERVER_DNS=MSname:


      Specifies the fully qualified domain name for the management server. To use a gateway server, enter the gateway server FQDN as MANAGEMENT_SERVER_DNS.


      MANAGEMENT_SERVER_AD_NAME=ADname:

      Use this parameter if the computer's DNS and Active Directory names differ to set to the fully qualified Active Directory Domain Services name.


      SECURE_PORT=PortNumber:
      5723

      ACTIONS_USE_COMPUTER_ACCOUNT={0|1}:

      Indicates whether to use a specified user account (0) or the Local System account (1).

      ACTIONSUSER=UserName:

      Sets the Agent Action account to UserName. This parameter is required if you specified ACTIONS_USE_COMPUTER_ACCOUNT=0.

      ACTIONSDOMAIN= DomainName:

      Sets the domain for the Agent Action account identified with the ACTIONSUSER parameter.

      ACTIONSPASSWORD= Password:

      The password for the user identified with the ACTIONSUSER parameter.

      AcceptEndUserLicenseAgreement=1:

      Used to specify that you accept the End User License Agreement (EULA).


      Sunday, 10 May 2015

      New Features added in SCOM 2016

      New Features added in SCOM 2016


      • SCOM 2016 is the next version of SCOM after SCOM 2012.
      • There architecture remains the same, but the support for dasboard has been improved vastly.
      • If you have see the SQL mp then you could see cool charts being displayed.
      • The same has been extended to all the MP's and given as a template which you can extend it to your MP as well.
      • The support for Azure is also improved,earlier you have connect through certificates to establish connection, but now you connect through Azure AD,so you just have to enter the username and password and it will connect you to the Azure platform from scom.This is a huge welcome move.
      • Also it will support Windows 2016,and SQL 2014.

      Thursday, 7 May 2015

      DFS File System Management pack for Windows 2012 R2/2008/2003 - Step by Step Install

      DFS File System Management pack for Windows 2012 R2/2008/2003


      • File system is one of the biggest thing in any company.
      • And Monitoring Distributed File System is one great Challenge.
      • Microsoft has given a Management pack to Monitor the File system on Windows 20012 R2,2008 R2 and 2003.
      • You can download the MP from here-->Click here
      • The File Services management pack retrieves events and other health information generated by the services that make up the File Services role. Some of the role service management packs included in the File Services Management Pack also track important operational parameters such as the use of the Distributed File System (DFS) Replication staging area and the number of replication conflicts generated.
        In addition to the overall File Services role, this management pack monitors the following role services:
        • DFS Namespaces
        • DFS Replication
        • File Server (the Server service for SMB file sharing)
        • File Server Resource Manager (the service used for File Server Resource Manager and File Classification Infrastructure)
        • Services for Network File System 
      • Following are the supported OS
      • Monitored Computer
        Support
        Windows Server 2012
        Supported
        Windows Server 2008 R2
        Supported
        Windows Server 2008
        Supported
        Windows Server 2003
        Supported
        Windows 8
        Supported
      • Importing the MP is straight forward.Just Download all the MP's from above link.
      • Open SCOM console go to Administration --> Management Pack--> Right Click and select Import Managemet Pack.
      • Select from Disk Option and the select all the MP's that are Downloaded.
      • Please note that you have to remove older vesriosn of DFSS Replication management packs prior to installing the NEW DFS Replication management pack.