Showing posts with label Linux. Show all posts

Wednesday, 26 April 2017

Install Bash Shell on Windows to Execute Linux Commands from Windows

Install Bash Shell on Windows to Execute Linux Commands from Windows


  • To install Bash,your PC should be running a 64-bit version of Windows 10 Anniversary Update build 14393 or later
  • Now Open Settings -> Update and Security -> For developers
  • Select the Developer Mode radio button

  • Then from Start, search for "Turn Windows features on or off" (type 'turn')
  • Select Windows Subsystem for Linux (beta)

  • Click OK
  • Now Open a PowerShell prompt as administrator and run:
Enable-WindowsOptionalFeature -Online -FeatureName Microsoft-Windows-Subsystem-Linux


  • Restart your computer when prompted

Create Linux VM Using Powershell in Azure

Create Linux VM Using Powershell in Azure


  • Azure is the leading Cloud Platform today.
  • Lot of Customers are having a Hybrid setup with Cloud.
  • So With power shell now so famous lot of companies have deployed Azure CLI 2.0 to extend thier powershell skill in Cloud.
  • In Order to Create a Linux VM in cloud using powershell and CLI2.0 installed on you system use this command

az vm create -n LINUX01 -g LinuxGroup --image UbuntuLTS

  • This will create the Linux Machine called "LINUX01" with Ubuntu OS

Tuesday, 17 January 2017

Install a Linux SQL Server VM in Azure Step by Step Tutorial

 Install a Linux SQL Server VM in Azure Step by Step Tutorial


To Create a Linux VM with SQL Server installed

  • Open the Azure portal.
  • Click New on the left.
  • In the New blade, click Compute.
  • Click See All next to the Featured Apps heading.
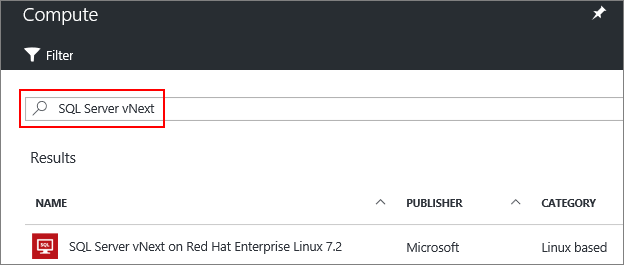
  • In the search box, type SQL Server vNext, and press Enter to start the search.


  • Select a SQL Server vNext image from the search results.
  • Click Create.
  • On the Basics blade, fill in the details for your Linux VM.
  • Click OK.
  • On the Size blade, choose a machine size. For development and functional testing, we recommend a VM size of DS2 or higher. For performance testing, use DS13 or higher.

  • Click Select.
  • On the Settings blade, you can make changes to the settings or keep the default settings.
  • Click OK.
  • On the Summary page, click OK to create the VM.

Install SQL Server tools on Red Hat Enterprise Linux Step by Step tutorial

Install SQL Server tools on Red Hat Enterprise Linux


  • Enter superuser mode.

sudo su


  • Download the Microsoft Red Hat repository configuration file.


curl https://packages.microsoft.com/config/rhel/7/prod.repo > /etc/yum.repos.d/msprod.repo


  • Exit superuser mode.


exit


  • Run the following commands to install 'mssql-tools' with the unixODBC developer package.


sudo yum update
sudo yum install mssql-tools unixODBC-utf16-devel

Uninstall SQL Server on Red Hat Enterprise Linux Step by Step Tutorial

Uninstall SQL Server on Red Hat Enterprise Linux Step by Step Tutorial


  • In order to remove the mssql-server package, follow these steps:

  • Run the remove command. This will delete the package and remove the files under /opt/mssql/. However, this command will not affect user-generated and system database files, which are located under /var/opt/mssql.

sudo yum remove mssql-server

  • Removing the package will not delete the generated database files. If you want to delete the database files use the following command:

sudo rm -rf /var/opt/mssql/

Upgrade SQL Server on Red Hat Enterprise Linux Step by Step Totorial

Upgrade SQL Server on Red Hat Enterprise Linux Step by Step Totorial


  • In order to upgrade the mssql-server package, execute the following command:

sudo yum update mssql-server


  • These commands will download the newest package and replace the binaries located under /opt/mssql/. The user generated databases and system databases will not be affected by this operation.

Install SQL Server on Red Hat Enterprise Linux 7.3 Step by Step Tutorial

Install SQL Server on Red Hat Enterprise Linux 7.3 Step by Step Tutorial


Video:


  • You need at least 3.25GB of memory to run SQL Server on Linux. 
  • To install the mssql-server package on RHEL, follow these steps:
  • Enter superuser mode.

sudo su

  • Download the Microsoft SQL Server Red Hat repository configuration file:

curl https://packages.microsoft.com/config/rhel/7/mssql-server.repo > /etc/yum.repos.d/mssql-server.repo

  • Exit superuser mode.

exit

  • Run the following commands to install SQL Server:

sudo yum install -y mssql-server

  • After the package installation finishes, run the configuration script and follow the prompts. Make sure to specify a strong password for the SA account (Minimum length 8 characters, including uppercase and lowercase letters, base 10 digits and/or non-alphanumeric symbols).

sudo /opt/mssql/bin/sqlservr-setup

  • Once the configuration is done, verify that the service is running:

systemctl status mssql-server

Saturday, 15 October 2016

SCCM 2012 R2 Log files for Linux and Unix Machines - Troubleshooting


SCCM 2012 R2 Log files for Linux and Unix Machines - Troubleshooting


Client for Linux and UNIX

For System Center 2012 Configuration Manager SP1 and later:
The Configuration Manager client for Linux and UNIX records information in the following log files.
System_CAPS_tipTip
Beginning with client for Linux and UNIX from cumulative update 1, you can use CMTrace to view the log files for the client for Linux and UNIX.
System_CAPS_noteNote
When you use the initial release of the client for Linux and UNIX and reference the documentation in this section, replace the following references for each file or process:
  • Replace omiserver.bin with nwserver.bin
  • Replace omi with nanowbem
Log name
Details
scxcm.log
This is the log file for the core service of the Configuration Manager client for Linux and UNIX (ccmexec.bin). This log file contains information about the installation and ongoing operations of ccmexec.bin.
By default, this log file is created in the following location: /var/opt/microsoft/scxcm.log
To change the location of the log file, edit /opt/microsoft/configmgr/etc/scxcm.conf and change the PATH field. You do not need to restart the client computer or service for the change to take effect.
You can set the log level to one of four different settings:
  • ERROR: Indicates problems that require attention.
  • WARNING: Indicates possible problems for the client operations.
  • INFO: More detailed logging that indicates the status of various events on the client.
  • TRACE: Verbose logging that is typically used to diagnose problems.
To change the log level, edit /opt/microsoft/configmgr/etc/scxcm.conf and change each instance of the tag MODULE to the desired log level.
scxcmprovider.log
This is the log file for the CIM service of the Configuration Manager client for Linux and UNIX (omiserver.bin). This log file contains information about the ongoing operations of nwserver.bin.
By default, this log is created in the following location: /var/opt/microsoft/configmgr/scxcmprovider.log
To change the location of the log file, edit /opt/microsoft/omi/etc/scxcmprovider.conf and change the PATH field. You do not need to restart the client computer or service for the change to take effect.
You can set the log level to one of three different settings:
  • ERROR: Indicates problems that require attention.
  • WARNING: Indicates possible problems for the client operations.
  • INFO: More detailed logging that indicates the status of various events on the client.
To change the log level, edit /opt/microsoft/omi/etc/scxcmprovider.conf and change each instance of the tag MODULE to the desired log level.
Under normal operating conditions the ERROR log level should be used. The ERROR level of logging creates the smallest log file. As the log level is increased from ERROR to WARNING to INFO to TRACE, each step results in a larger log file as more data is written to the log file.

Manage Log Files for the Client for Linux and UNIX Client

The client for Linux and UNIX does not limit the maximum size of the client log files, nor does the client automatically copy the contents of its .LOGfiles to another file such as a .LO_ file. If you want to control the maximum size of log files, implement a process to manage the log files independent from the Configuration Manager client for Linux and UNIX.
For example, you can use the standard Linux and UNIX command logrotate to manage the size and rotation of the clients log files. The Configuration Manager client for Linux and UNIX provides an interface that enables logrotate to signal the client as to when the log rotation completes, allowing the client to resume logging to the log file.
For information about logrotate, see the documentation for the Linux and UNIX distributions that you use.

Saturday, 21 May 2016

How to Enable Logging for Linux agent in SCOM 2012 r2

How to Enable Logging for Linux agent in SCOM 2012 r2

    • Linux agent is one of the most challenging to monitor in SCOM. As is cross platform monitoring it does not give clear error when there is error.
    • So you should enable Loging on Agent to see whats happening.
    • Once loging is enabled you can see log created in /var/opt/microsoft/scx/log.log
    • To see the current state of loging type scxadmin -log-list
    • To set loging to Troubleshooting type scxadmin -log-set all verbrose

    • This will set the loging to TRACE and will start recording all events.
    • Once your troubleshooting is compeleted you have to reset the log back/
    • To do this use the command scxadmin -log-reset
    • This will reset the logs back to info level from Trace level

Thursday, 5 November 2015

How to Install Zabbix on Red Hat Linux or Cent OS Step by Step


How to Install Zabbix on Red Hat Linux or Cent OS


Zabbix is the fastest growing monitoring tool today in market. Lot oc companies want to cut down the cost on monitoring and move to Opensource and Zabbix has emerged as the prefered choice.

Step 1: Installing repository configuration package


  • Install the repository configuration package. This package contains yum configuration files.


Command:

# rpm -ivh http://repo.zabbix.com/zabbix/2.4/rhel/6/x86_64/zabbix-release-2.4-1.el6.noarch.rpm


Step 2: Installing Zabbix packages

Install Zabbix packages. This example  install Zabbix server and web frontend with mysql database on same server

Command:

# yum install zabbix-server-mysql zabbix-web-mysql zabbix-agent

If you want to install agent only for monitoring follow the below steps

# yum install zabbix-agent


Step 3:Creating initial database

Create zabbix database and user on MySQL. Import initial schema and data.

Command:

# cd /usr/share/doc/zabbix-server-mysql-2.4.0/create
# mysql -uroot zabbix < schema.sql
# mysql -uroot zabbix < images.sql
# mysql -uroot zabbix < data.sql

Edit database configuration in zabbix_server.conf

# vi /etc/zabbix/zabbix_server.conf
DBHost=localhost
DBName=zabbix
DBUser=zabbix
DBPassword=zabbix

You can give any complex password you want.

Step 4:Start Zabbix server process:

# service zabbix-server start

Step 5:Editing PHP configuration for Zabbix frontend

Apache configuration file for Zabbix frontend is located in /etc/httpd/conf.d/zabbix.conf. Some PHP settings are already configured.

# vi /etc/httpd/conf.d/zabbix.conf

php_value max_execution_time 300
php_value memory_limit 128M
php_value post_max_size 16M
php_value upload_max_filesize 2M
php_value max_input_time 300
# php_value date.timezone Europe/Riga
It's necessary to uncomment the “date.timezone” setting and set the right timezone for your location.

After changing the configuration file restart the apache web server.

# service httpd restart

Step 6: Done Your server is ready


  • Zabbix frontend is available at http://ipddress/zabbix in the browser. 


Default username/password is Admin/zabbix.


Enjoy!